There's a number of sources on the Web describing how to write a Wireshark dissector. What I haven't found is a clear and concise guide that covers obtaining the source, adding a dissector, compiling, and testing a dissector against some generated traffic. That's what this guide aims to be.
git clone https://github.com/wireshark/wireshark.git
Around time of writing, I had some difficulties getting the master branch to
build. I worked around this by checking out the master-2.4
branch. You may like to do something similar if you have issues building from
master.
    ./autogen.sh
    ./configure --enable-setcap-install --with-dumpcap-group=wireshark
    make
This should generate a wireshark executable in the top level of
the git checkout directory.
It's generally advisable not to run the entirety of Wireshark as root. Consult the Wireshark Capture Privileges guide on how to configure Wireshark to run without root before proceeding. A quick note: I ran into trouble running Wireshark without root when built on an ecryptfs (encrypted) drive. I believe this is because the ecryptfs drive is mounted nosuid and file based capabilities are ignored if the executable is stored on a nosuid file system. Following a suggestion on the wireshark-users mailing list to use ambient capabilities, I was able to get it working with this little script.
Next, run Wireshark from the build directory as follows:
WIRESHARK_RUN_FROM_BUILD_DIRECTORY=1 ./wireshark
The WIRESHARK_RUN_FROM_BUILD_DIRECTORY environment variable is
being set above so
that Wireshark
looks in the build directory for all the relevant files, rather than the
directories of a standard Wireshark install.
Wireshark dissectors are either built into the main source, or loaded as "plugins". A plugin is easier to get started, so that's what we show here. The "foo" plugin described here does the bare minimum needed to confirm end-to-end that Wireshark has registered the plugin, and that data is matching the dissector. This plugin is heavily based off the Adding a basic dissector section of the Wireshark docs.
Rather than list out the code here, I simply link to a code diff here.
Now that you've applied the plugin change, build Wireshark again per the previous build instructions.
Now that you've built Wireshark with your new plugin, run Wireshark again, the
same way you did previously. Open the Wireshark menu Analyze →
Protocols. Search for foo and you should see the foo
protocol listed.
Below is a simple pair of server and client Python programs that you can use to generate some traffic matching the foo protocol:
  # server.py
  from socket import *

  serverSocket = socket(AF_INET, SOCK_DGRAM) # UDP
  serverSocket.bind(('', 1234))

  while True:
      message, address = serverSocket.recvfrom(1024) # buffer size
      serverSocket.sendto('thanks', address)
and
  # client.py
  import time
  from socket import *

  clientSocket = socket(AF_INET, SOCK_DGRAM)
  clientSocket.settimeout(1)
  message = 'test'
  addr = ('127.0.0.1', 1234)

  start = time.time()
  clientSocket.sendto(message, addr)
  try:
      data, server = clientSocket.recvfrom(1234)
      end = time.time()
      elapsed = end - start
      print '%s %d' % (data, elapsed)
  except timeout:
      print 'REQUEST TIMED OUT'
Run the server first:
python server.py
Now, start a capture on the loopback interface in Wireshark. Then, run the client to generate some traffic:
python client.py
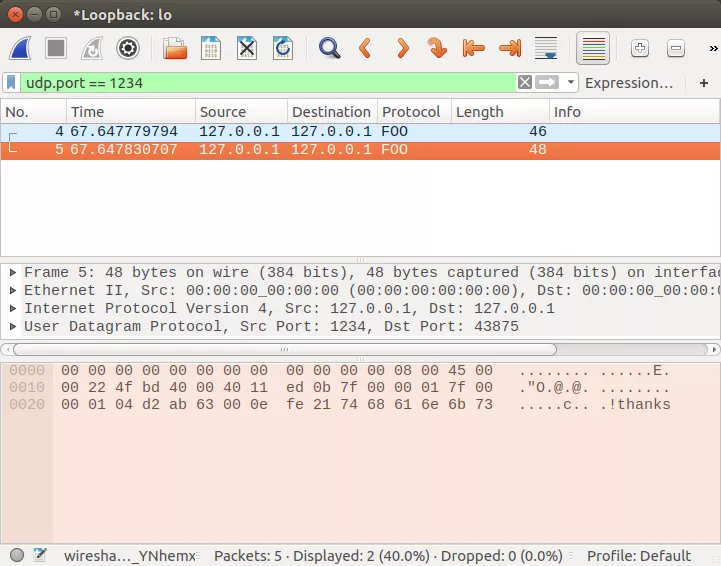
You should see some traffic in Wireshark with the Protocol field listed as "FOO":

This is the extent of this article. Hopefully it'll get you on your way to implementing a Wireshark dissector. You'll now want to flesh out the dissector implementation for the specifics of your protocol. For that, I recommend you go back and read the Packet Dissection chapter of the Wireshark docs.